Wednesday, April 30, 2014

Clean-up time? Never fear! Quick and Easy Polish Removal and Nail Clean-up!

Hello readers!... and HAPPY HUMP DAY!!! It has been mentioned to me in the last week or so that because I am not "more experienced" I should not be giving how-to advice, or doing informational posts. Let me start off by saying that I am not an "expert", nor have I been to beauty school to earn my license as a Nail Technician. What I do have is knowledge in what works for me. I thought maybe if it worked for me, it might help other newbies in the polish world too. With that being said, I know there are a ton of informational and how-to posts out there for nail polish. I encourage each and every one of you to take a look around at them and find what also will work best for you. There is no one solution to it all, so keep that in mind. This is how I found my methods, and I combined what I learned from different places such as nail groups, blog posts, and forums.

So, I hear many ladies complaining that they absolutely HATE polish removal and prep. Some even commented that it takes them forever, thus the lack of love for the procedure. I am here to tell you there is some simple solutions.


 This is coming from someone who had nails like this:
 
 
November 2012
 
To nails that look like this in a years time. This was after 39 years of chewing and biting my nails and cuticles. I have used the same products and regimen for the last year, and they are working!
 
 November 2013
 
Let's start with polish removal. You cannot prep your nails for a new manicure without taking off what you already have on. My FAVORITE method is the using the non-acetone sponge tubs. These tubs are also great if you are painting your nails, mess one up, and need to start over with just one nail. You can insert your finger and not risk getting remover on the other freshly painted nails!
 
All you have to do is simply stick your fingers in the sponge insert, and do a little twisting around of your finger. This method even works for glitter removal. I Usually insert my glitter nail for about 30 seconds and soak first then a few twists and most of the glitter is removed.  


This method for this particular mani, complete with Seche topcoat, took me about 1 minute to remove the polish from these 3 fingers. The bonus is, no cotton ball hairs or fuzz from cosmetic rounds left on the nails edges or on the nail bed.
 
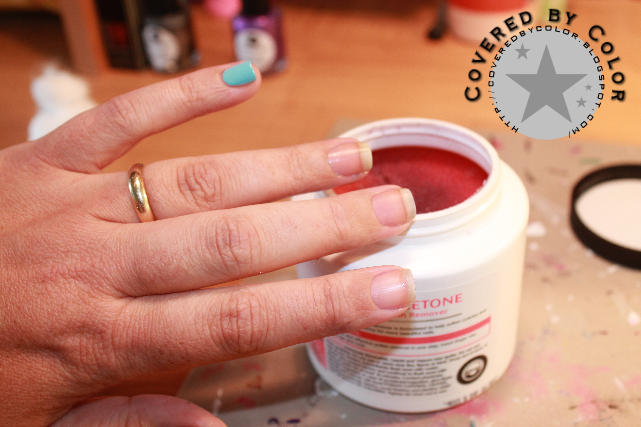
Complete removal in about a minute and a half to a minute. Not too shabby?
 
 
Now that we know polish removal doesn't have to take so long, let's talk about maintenance to maintain clean nails. I do regular maintenance approximately twice a week, sometimes only once if I wear a mani for a longer period of time. (Like THAT ever happens! LOL!) This maintenance will help keep your nails whiter, and easier to "prep" for your new mani.
 
First, after you remove your next bout of polish, turn your hand over and look under your free edge and all that marvelous polish from wrapping your tips. ...Oh, and let's not forget the crud that just gets stuck under your nails. Food, dead skin from scratching, etc.. Mine here have not been done in about six days. Even though I use a nail brush when washing my hands, there are still remnants left there by the time I need to do my weekly maintenance.


This next step once a week or more really does help me keep the undersides of my nails clean.
Two important tools for my regimen is a wide paint brush and a toothbrush. A nail brush also works, but I like to focus on one nail at a time.  
 
First I use a tooth brush to scrub under my nails. I also will use the toothbrush to scrub my nail beds and around the outer edge of my nails to remove any polish remnants.
 
 
Then, I dip the wide brush into acetone letting the brush stay wet, I do not wipe the side of the dish to remove excess.


And the wipe away what is left under there with the brush. Total time for me, about three minutes to do the undersides of my nails.
 
My favorite product for prep and clean up that I use once to twice a week is Blue Cross Cuticle Remover from Sally's. As you can see from the photo it is a HUGE bottle. I have had this bottle since February of 2012, and I still have that much left in the bottle. To use this, I drop a drop or two onto my nail bed near the cuticle. I let it soak on for about 15-20 seconds.
 
 
Then, using the angled end of the orange stick, I rub away the dead cuticle and skin from the base of my nail bed, and along the edges o the sides of my nail.
 
 
Then, I place a drop behind the nail and then use the orange sticks angled end (flat side against the finger and not the nail) in there and do a little clean out of more hidden gunk. (You may notice nippers in the background, and I want to make it clear that I DO NOT nip my cuticles or nails. They are used for trimming my clean up brushes.)
 
 
Once complete, I use a good sugar scrub or my favorite product from Julep, the Glycolic Hand Scrub, to wash my hands thoroughly in warm water. This removes the Blue Cross, removes any dead skin on my hands, and leave my hands so soft and sooth. As you can see from my YUMMY grilled cheese spatulas, I leave the products in my kitchen y my sink. This part of the maintenance was what takes the longest, but you don't have to do it every day or after every mani. For this part of the procedure, it takes me about 5-10 minutes depending on if the idiot box is on and I am half paying attention. When I first started doing this step, it took me about 15 minutes.
 
 
As you can see from the photo below, the undersides of my nails are now nice and clean!
 
 
Here is my finished weekly (sometimes twice a week) finished product. It does make a huge difference. What is nice, is that it is not necessary after every manicure. If I find tat after I take my polish off that I still have some remnants of polish around my cuticles, or that they look dingy, I usually use the toothbrush to clean up any extra polish left behind, then I repolish.
 
After I complete all the above steps, I use cuticle oil and lotion BEFORE I polish (unless I am in a hurry) Then I use the wide brush shown above to swipe each nail bed with acetone or alcohol so my base coat will still adhere to the nail. My favorite oil is Bliss Kiss Pure Nail Oil, and that is the one I use everyday and on maintenance day. I have several other balms and oils that I will alternate throughout the day.
 
What do you think? Do you have a weekly regimen or procedure you do to your nails? Do you have prep? Do you find any of this helpful at all? Let me know!!! I am working on a second part to this involving clean up brushes and procedure. So be sure to stay tuned!
 
Until next time~
Jenn


Monday, April 28, 2014

Jade Polishes to Cure the Monday BLAHS!

Hello lovely readers! Today my husband is out of town for the next couple of days, so I was having the BLAHS! I miss him when one of us is away!!! Anywho, I decided to play in my polish and swatch some lovely Jade Polishes for you. These have been in my drawer for MONTHS, and they were the first brand of holographic polishes I bought! I think often times they get overlooked as a good holoraphic polish. So, as you can probably guess, I bough these polishes on my own and am reviewing them of my own accord. This post is my honest opinion of the polishes.

First up I have a non holographic polish from Jade. The name of this one is Vestido de Gala. It's a red leaning magenta jelly like polish with scattered tiny holographic glitters. It applies quite smoothly. I used 2 coats. The first coat did drag a little, but it evened out quite nicely in the second coat. I used HK Girl topcoat for all of the swatches.

No flash:
 
With Flash:
 
 
Next up is Deja Vu. It is a really pretty light pink holographic polish. It applied nice and smooth. One coat may be enough, but I used two for these swatches. You can see a nice orange flash in the close up photo.
 
Up close with flash:
 
 
 Without Flash:
 
With Flash:
 
Finally this evening I have Hypnose. It is a bright blue leaning teal holographic polish. I had a little trouble with application with this one. I almost think it was perhaps too thick from sitting for so long. It was a little streaky and didn't even out well as you can see in one of the photos. Again, there are two coats for these swatches.
 
 
Close-up with flash:
 
 
With flash:
 
Without flash: 
 
Overall Jade is a very nice polish. The holo is nice and strong in the sun, which I was unable to capture because there was no sun most of the day. The only drawback I can see with Jade is the size of the bottle. The price does make up for that though compared to other holographic polishes.
 
You can purchase these from stockists such as Llarowe, located here: http://www.llarowe.com/
 
I look forward to trying some of their crème polishes. They look really nice. For $5 a bottle the price is pretty great.
 
What do you think? Do you own any Jade polishes? Please leave me some comments with your thoughts on these! Don't forget to follow me! :)
 
Until next time~
Jenn


Thursday, April 24, 2014

Let the Water Marble Tips, tricks, and Comparisons continue... (Part II)

Hello there friends! Welcome back for part two of my water marble post. If you missed Part I, you can find it here: http://coveredbycolor.blogspot.com/2014/04/im-no-expert-but-i-have-few-water.html

Just to reiterate, I am still using the same water from the marbles you saw yesterday. I am rating each brand for marbling on a scale of 1-10 with ten being the BEST and 1 being the WORST, in my own opinion and experience.

we left off yesterday after marbling with some China Glaze, OPI, Julep, Sephora by OPI, and Orly. let's get down and dirty with the next round!

First up today is Zoya. The colors I used were Arizona, Rocky, and Sofia.

As you can see in the photo above, Arizona (the orange) spreads a little too much. Creating uneven spreads among the colors.

The end result was nice. I wish I had a better picture. I had more orange sections on my nail than the other colors though. My experience with Zoya is that some colors marble really well, and some just don't. I am giving Zoya a rating of 6 on my 1-10 scale.

Next up is Sinful Colors. The colors I used were Candy Coated, Sugar Rush, and Why Not?

The spread in the photo above was super nice. I could have went on dropping a little bit further, but chose not to.


The purple color (Candy Coated) does not show up well. After looking at the bottle I figured out why. It has a shimmery finish. I am giving Sinful Colors an 8 on my 1-10 scale. I have used Sinful MANY times to marble and get decent results.

Next up we have Wet N Wild Wild Shine. Colors used were Blazed, Sunny Side Up, and Lady Luck.

As you can see from the above photo, this polish spread perfect. I also want to note that these are not super opaque polishes. They are a little on the sheer side, so expect the colors to dull a little when marbling with them. This is why in Part I posted yesterday I suggest you wear a white undie or other undie of your choice.


Drawing my design was super easy with the great spread I had.


Nice results even though the color is a little diluted. I like this result. I am going to give WnW Wild Shine a 7 on my 1-10 scale. I have marbled with several of these and usually have a nice consistent result.

Finally, I have some Sally Hansen X-Treme Wear polishes. Colors used were Pin Punk, Blue Me Away, and Mellow Yellow.

I LOVE this spread. The colors stay vibrant and spread evenly.


Drawing a design was simple with this spread.


You can see in the photo above the colors stayed bright, and the design came out wonderous!!! I absolutely LOVE marbling with this brand, and almost always have great results. I give this brand a 10 on my 1-10 scale.

Now you may be scratching your head wondering the point of all this. Water marbles are a matter of trial and error. I have tried all of the above brands at one point or another, and have struggled with some. I was told it was probably my water temperature, but you can see that if I used the same bowl of water for each brand, then why would some marble at that temp and others not?

Some added tips that I thought of after writing Part I:
1. After removing your finger from the water, place your handover a trash bin (nail tips pointed down towards the can) and give your hand a couple gentle jerks. (Now that sounded like a porno! HAHA!) This will shake the excess water form the nail and help reduce bubbles that can occur.

2. Be sure you remove ALL of the polish off the top of the water before you remove your nail form the water. One way I do this is to blow gently on the polish and then use a toothpick and roll it through the polish.

3. If the tip of your toothpick become too goopy with polish while drawing your design, roll it on a piece of wax paper between passed. You should only use the very tip and gently swipe it through the polish, you should not be submerging it as you draw the design.

4. Don't worry about using the outer rings of polish when drawing your design. Those tend to be dryer and sometimes it can ruin the design to try to draw in them.

5. HAVE PATIENCE and PRACTICE. Buy some cheap-o drugstore polishes and experiment one day when its rainy or you are bored. Do not get discouraged.

Let me know what you think! I would love to see you try using some of the info you found here. Send me your try or post it on Covered by Color's Facebook page. Thanks for stopping by!

Until next time~
Jenn


Wednesday, April 23, 2014

I'm no Expert... but I have a few Water Marble Tips for you! (Part I)

First off, let me start off with a small disclaimer. I by no means am a water marble expert. I think I do okay for someone who has done it maybe 25 times, and my water marble manis turn out OK... Because I see so many struggle with water marbling, I decided to share a few tips and tricks that help ME get decent water marbling results. As you can see from the photo below, I will be using sets of 3 polishes to show you formula differences and how it can affect your marble.


1. Let me begin with some important things you must do before you even sit down to marble. Have room temperature water. I keep a bottle of water on my desk with the lid on it. That way, the water is room temperature. Water that is too hot or too cold simply will not work. I have seen it mentioned on different blogs and tutorial videos that certain water works better than others. I don't seem to see a difference. I use water from my tap, or I use spring water. Both work about the same for me.


2. Be sure you are not near a fan or heating and air duct. Blowing air can change how fast the polish sets in the water, and can prevent it from spreading.

3. Get your supplies ready BEFORE you start. Reaching for a toothpick while the polish is in the water can cause the polish to set and become useless. Also, keep in mind when choosing colors that because you are adding them to water, some colors may bleed over into the next color in the water bowl. Try to be mindful of colors that compliment each other. Do a trial run of your colors in the water to see if they spread well and the colors will compliment each other.

4. Use a base coat of polish. "Undies", if you will. I almost always use white. It allows the colors to be more vibrant. When you add polish to the water, it spreads out, and for some polishes it dilutes. You will see me use the word spread quite frequently in this post.

5. Tape around your fingers with tape. Trying to use Vaseline can make your water greasy, and can affect the spread of the polish. I prefer scotch tape. It is easier for me to tear off than painters or masking tape. Tape I GREAT for making clean-up simple and quick.

 
6. Make sure the polishes you want to use are open and ready. Fumbling around with bottles can cause the spread to set and then it will stop spreading.
 
7. Be quick. Drop one color, then the other inside, and so on. Do not pause in between!
 
OK! Now we are ready for the fun stuff! I highly suggest as a new water marbler, you do not use sheer, metallic, or sparkly polishes. They do not marble as easily as a good solid cream polish. For the purpose of this post, I used only opaque creamy polishes. Also, as a newbie, I would not recommend starting with more than three polishes. It can become difficult with four or five. For the purpose of this post, I also chose o keep brands together. You can mix and match brands by all means.
 
(water does not change for any of these marbles, I used the same bowl of water for all of them)
 
I am trying to make a point with this next information. Please bear with me if I sound confusing.
I will use a scale of 1-10, 10 being the BEST and 1 being the WORST. (This is my opinion, others may have different experiences.)
 
First set of polish:
 
First up is China Glaze. I used Light as Air, Rich and Famous, and recycle for this demonstration.


I add a drop at a time of each color. Now, notice how even the "spread" of the polish is. China Glaze spreads nicely for me, and the color concentration stays strong and doesn't dilute very much.
 
 
This is a successful marble, and on a scale of 1-10, I rate China Glaze a 8 for marbling.
 
Next, I did Orly. The colors I used were Red Flare, Lemonade, and Snowcone.
 
 
As you can see from the photo above, the first color spread fine, and the others just sat in the middle of the bowl. I call this a bad spread. It probably will not come out as nice as other marbles. Many people at this point might tell you to check your water temperature, but remember the China Glaze spread really well in the same bowl of water, at the same temperature. In my opinion, it's the polish that doesn't spread very well.
 
 
These colors bled into each other. It's not entirely awful, but not the look I was hoping for. I would give Orly a rating of 6 on a scale of 1-10.
 
Next up is OPI. The colors I used were I Theodore You, Amazon...Amazoff, and You're Such a Budapest.
 
 
From the photo above, you can see that these polishes spread really well. Two of the three diluted a little. I realized after that they weren't the most opaque colors I could have chosen, which could have been the issue. Since the argument could come into play again about water temperature, remember I used the same water bowl in the previous marbles.


The final result for the OPI is above. It has a very cool effect and I wouldn't call this a failure. I would rate the OPIs a 7 on a scale of 1-10.
 
Next we have Julep. For this marble I chose Nina, Lauren, and Courtney.
 
notice the spread is not equal, and it did not stretch very far towards the edge of the bowl. They started drying too fast. Same water as the previous marbles here as well.
 
 
I couldn't draw a great design because of the polish drying too fast.
 
 
It was a horrible mess! I have tried several times to marble with Julep with no success. In my opinion it's too goopy and dries too quickly to get a good spread on the water. I would rate Julep a 2 on a scale of 1-10.
 
Finally to close out this round, we have Sephora by OPI. Colors used were: Havana Dreams, Add a Cherry on Top, and What Aura Gonna Do?
 
 
That is an awesome spread!! There is even pooling of colors, and it stretches to the sides of the bowl very nicely. Again, same water as used for all of the other marbles.
 
 
Drawing a design in this spread was so easy and so pretty!
 
 
The final product came out very nice! The light blue of Havana Dreams sort of dilutes and fades out, but it blended nicely with the other two and gave a very pretty effect. This would be super for Valentines Day. On the 1-10 scale, I would rate this brand a 9 for marbles.
 
Stay tuned tomorrow for the second half and more brands with my ratings. Let me know down below what you think. Do you think these tips and tricks will help you? Will you try to marble using a different brand if it hasn't worked for you in the past?
 
Until tomorrow~
Jenn