Showing posts with label nail art. Show all posts

Monday, July 14, 2014

Nail Art Challenges by Friends and Family

HELLLLLLL-oh! Hope everyone is having a fabulous week! I know I am! :)

Let me start off by saying, I love to try new nail art on a regular basis. I have a HUGE Pinterest board of nail art just to inspire me or challenge myself. I like to try to do what others have done. It's fun and therapeutic for my depression.

I also find joy in trying things my friends and family post to my Facebook wall. I know I have probably seen the nails in question before, or have them pinned, but... I love a family member or friend saw them and thought of me enough to post them to my wall.

For three days now, my sister in law has been trying to show me a photo of nail art. Every time she would send it through Facebook messages, I could not see it. So, tonight she finally screen capped the image and posted it to my wall. When I saw the nails in question, I knew I had seen them before, but I wanted to try them out anyhow. I also had a new teeeeny tiny nail art brush I bought a couple months ago that I wanted to try, and this gave me the perfect excuse.

Now to get to the photo she posted for me....


Since this photo had obviously had the watermark removed of the original artist, I did a reverse Google image search for it. I believe these belong to "The Little Canvas". and you can find these nails here:

http://www.thelittlecanvas.com/2012/09/31-day-challenge-day-7-rainbow-nails.html

Now, onto my try at these beauties...

First I painted my nails a rainbow of creamy colors. 

 
Then added the white and black art. Let me say this... the nail art brush I bought was not that great. I wish I had used a striping brush instead!
 
 
These could have been neater, but as I stated, my nail art brush was not great! I will be doing these again sometime and trying to be neater.
 
Thanks Sis (Sherry)! It was a fun nail art to do!!!
 
Until next time~
Jenn


Sunday, May 18, 2014

Playing with You Polish Nail Decals!

Hey there followers and friends. Today's post includes some nail decals I was sent from Lauren at You Polish to review. In all honesty I have only ever used chevrons and had not had a chance to experiment with other shapes. You Polish has a ton of different shaped decals. The store also includes some really pretty polishes, lip scrubs, and even a montly sub box. You can find the shop here:
 
The average price of the decals is $5.50.
 
I am not he greatest nail artist out there. So, these were a huge help in creating nice looks. I am not going to go into details as to what polishes I use in every case, because I did a no-no and didn't write them all down.
 
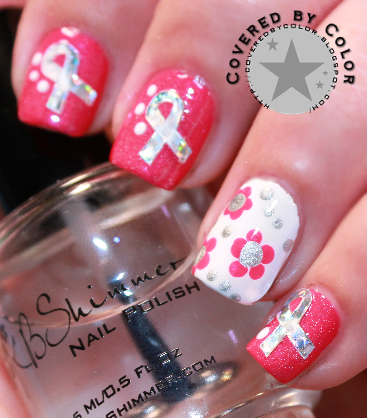
First up, I have these adorable holographic cause ribbons. They applied easily, removed from the backing quite easy, and I was easily able to lay them flat on my very curvy nails. My only complaint with these is that I have tiny pinky nails, and this was a little large for them. I managed to make it work though.


Next up, I have some tree branches with birds. They are a lavender color. These applied easy, but I had a bit of trouble getting them off the backing. The leafy end of the branches are delicate. So when removing them from the backing be very careful. I trimmed off the excess branch from around my cuticles.
 
I also had a little difficulty getting creative with these. I think you could use the branches for a negative space paint job, but I wanted to be sure I captured the leafy end on my nails.


Next up is anchors, waves, and mermaids. The anchors are gray, the waves are white, and the mermaids are yellow. I used the waves to attempt a negative space paint job. The others I used and applied like stickers. This came out cute, even though I had a creative block. I would recommend you use a toothpick to remove the anchors and slide the end underneath and lift it a little at a time. I tore my first one using tweezers.


Next up are the chevrons. These are great for negative space manicures and looks. They went on easy, came off the backing easily, and came off easy when removing them.


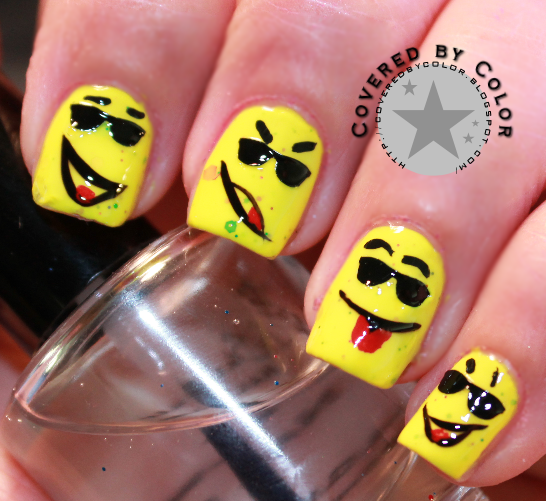
Finally, my FAVORITE look! The little sunglasses are super duper cute. I am a HUGE fan of the yellow smiley faces. I HAD to pull out KB Shimmer Blinded by the Bright for this look. Again I used a toothpick because I tore the first two trying to get them off the backing. The bridge of the glasses is delicate.


Overall, these were very nice decals. I would recommend them to my polish friends. Although the couple of times I ripped decals removing them from the backing, that was the users fault, and not the fault of the decals or the backing. I am too rough on teeeeny things! :P I have a couple more to show you next week too.
 
What do you think of nail decals and vinyls? Do you have any? Let me know what you think in the comments. Also, don't forget about my giveaway going on here:
 
Visit You Polish on Facebook here:
 
 
 Until next time!~
Jenn


Sunday, November 24, 2013

In the mood for.....a GIVEAWAY and Candy Canes?

Hello lovely readers! Today, since I am in the spirit of giving and the holiday season is upon us, I am going to share a quick and easy holiday mani with you and a giveaway!!! For this mani, I used the polishes below:

They are KB Shimmer Candy Cane Crush, Zoya Gei Gei, China Glaze Just Be-Claws, a white striper, and a thin paint brush. You could use any pink or red polishes and you could also substitute any of the colors to get the same look.

First I painted the pink Zoya Gei Gei on each of my nails as a base color. I then used Candy Cane crush on my ring finger and thumb as an accent.

On each of my other fingers, I painted lines/stripes in varying thickness to mock candy cane stripes. I didn't make them straight across and gave them kind of the twisted warped look of a candy cane stripe.

Here are my results:
 
 
With flash:
 

Without flash:
 
What do you think? Will you try this look for the holidays? Do you love candy canes? I do!!!
 
Now onto the giveaway!!!
 
 
THE SUPER MEGA HOLIDAY GIVEAWAY
This give away is so big that there are 3 separate Raffle-copters and 50 prizes totaling up to a whopping $1233 approximate value!
Starts now! And goes until December 26th at 12AM
You can find the list of prizes, sponsors, and the rafflecopters at Happy in Holos:

Remember fill out as many options as possible for more chances to win!!!!
 
GOOD LUCK READERS!!!
 

Friday, November 22, 2013

Patience is a virtue... or is it?

Do you have patience when it comes to polish and nail art? I somewhat do when it comes to doing nail art. When it comes to waiting on shipping for an order (unless it's a pre-order) I want what I order ASAP. I have held off on ordering from Born Pretty Store for this exact reason until the first of this month. I broke down and ordered a bunch of nail art supplies and a phone cover, which without my coupons and discounts would have cost me over $25. I ended up paying $16.94. So, I couldn't resist. It is not the 22nd, and I still don't have my package. So, Since I have no patience, I did a nail art design that required a TON of patience... LOL.

Here is what I did and how I did it.

Step 1: Choose a base color and then a glitter polish that has a decent size circle, square, or hexagonal shaped glitter inside. Make sure the two polishes compliment each other. (For this how to I chose Zoya Blu and OPI Polka.com)

Step 2: Have a piece of wax paper or a glass plate handy that you can place some of the glitter polish onto.

Step 3: Paint your nail the base color.

Step 4: Paint some of the glitter onto the wax paper or plate as shown in the picture below. Just paint a small spot. The polish dries up quickly when you paint it that thin, so you will need to paint more spots as you move on. Since the coats are thin, you don't waste much polish.

 
Step 5: HAVE A TON OF PATIENCE AND A STEADY HAND!!! Using a toothpick or orange stick place glitters on your accent finger covering your entire nail in a pattern you desire. Since Polka.com has pink, teal, and purple glitters, I did pink alternated with random purple and teal.
 
Step 6: On the other nails, create a French tip look using two rows of the glitters.
 
Finished product no flash:
 
 
Finished product with flash:
 
I found the faster I went and the less I focused on the glitters, the easier it seemed. Now, I think I will wait for my larger glitters from Born Pretty Store! LOL! What do you think? Will you try this method?
 
Leave me comments below! I love reading them and I will always try to reply! Also don't forget to follow me on Facebook and with GFC and Bloglovin. I am also on Instagram @covered_by_color.
 
Thanks for stopping by!
-Jennifer